IntelliReach User Guide: Senders, Campaigns, Clients, Reply Tracking, and Billing
Help and Guides
IntelliReach User Guide: Senders, Campaigns, Clients, Reply Tracking, and Billing
A practical step-by-step IntelliReach guide covering senders, warm-up, campaign setup, client management, reply tracking, and invoice billing.

Table of contents
ContentsQuick Start1. Adding Sender AccountsHow to Add a Sender AccountOption 1. GoogleOption 2. MicrosoftOption 3. Custom SMTPWhat to Check After Connecting2. Warming up accountsWhen warming up is mandatoryHow to start warming upWhat do the warmup parameters meanSafe start for most new accountsWhat account statuses can you seeWhen can you use the manual “Warmed up” mark3. Creating a CampaignStep-by-step campaign creation scenarioBasic fields at the top of the formAI chat for defining the campaign taskHow it worksGood example for an AI chat requestWhy use the AI chatWhat the Intent Summary meansAdvanced mode: when to useBreakdown of all advanced mode settingsHow to decide between Precise and BroadPreciseBroadSending limits and scheduleExcluded client typesBuilding the email sequenceHow the sequence worksWhat follow-up delay meansHow to write the first emailSpintax: what it is and how to use itSyntaxWhere to use spintaxHow to use spintax properlyImprove with AIHow it worksWhen AI improvements are especially usefulCheck style: quick quality reviewSignature and unsubscribe link4. Launching a Campaign and Monitoring ResultsHow to Launch a CampaignWhere to View ResultsWhat You See in the “Campaigns” ListWhat to Look For in Campaign DetailsHow to Monitor DeliverabilityWhat’s Especially Important to WatchIf Deliverability Is PoorHow to Know When It's Time to Take Action5. The "Clients" SectionWhy you need the "Clients" sectionMain statuses in the client databaseHow to use the "Clients" sectionWhat you can do in the client tableImporting a database into the "Clients" sectionHow to fill out a company profileWhy this is convenient6. The "Reply Tracking" SectionWhat reply tracking offersHow to enable trackingHow connection differs for various account typesWhat the IMAP connection fields meanWhere to view replies after connectingHow tracking works with sequencesLimitations and practical notes7. Subscription and Invoice BillingWhen to use invoice billingWhich fields must be filled outStep-by-step instructionsWhat you can pay for by invoiceWhere to view status and documentsPractical Deliverability TipsPractical takeaway
Use this article as a checklist before the next campaign launch so the outbound process stays consistent.
Article metadata
Updated: Mar 15, 2026
Detailed User Guide
Briefly about the service logic: you connect sender accounts, warm them up, create a campaign, launch it, monitor deliverability and replies, and store found companies and contacts in the Clients section as in an internal CRM.
Contents
- Quick Start
- 1. Adding Sender Accounts
- 2. Warming Up Accounts
- 3. Creating a Campaign
- 4. Launching a Campaign and Monitoring Results
- 5. "Clients" Section
- 6. "Reply Tracking" Section
- 7. Subscription and Invoice Payment
- Practical Deliverability Tips
Quick Start
- Connect at least 2-5 sender accounts if you plan to run regular campaigns.
- Start warming up new accounts right away.
- For at least one sender account, enable reply tracking to see real responses in a single inbox section.
- Create a campaign: start with audience and settings, then write the email texts.
- Before a large-scale launch, keep a moderate daily limit and check the deliverability block.
- If emails start landing in spam, it's better to pause the campaign, further warm up the accounts, and simplify the email texts.
1. Adding Sender Accounts
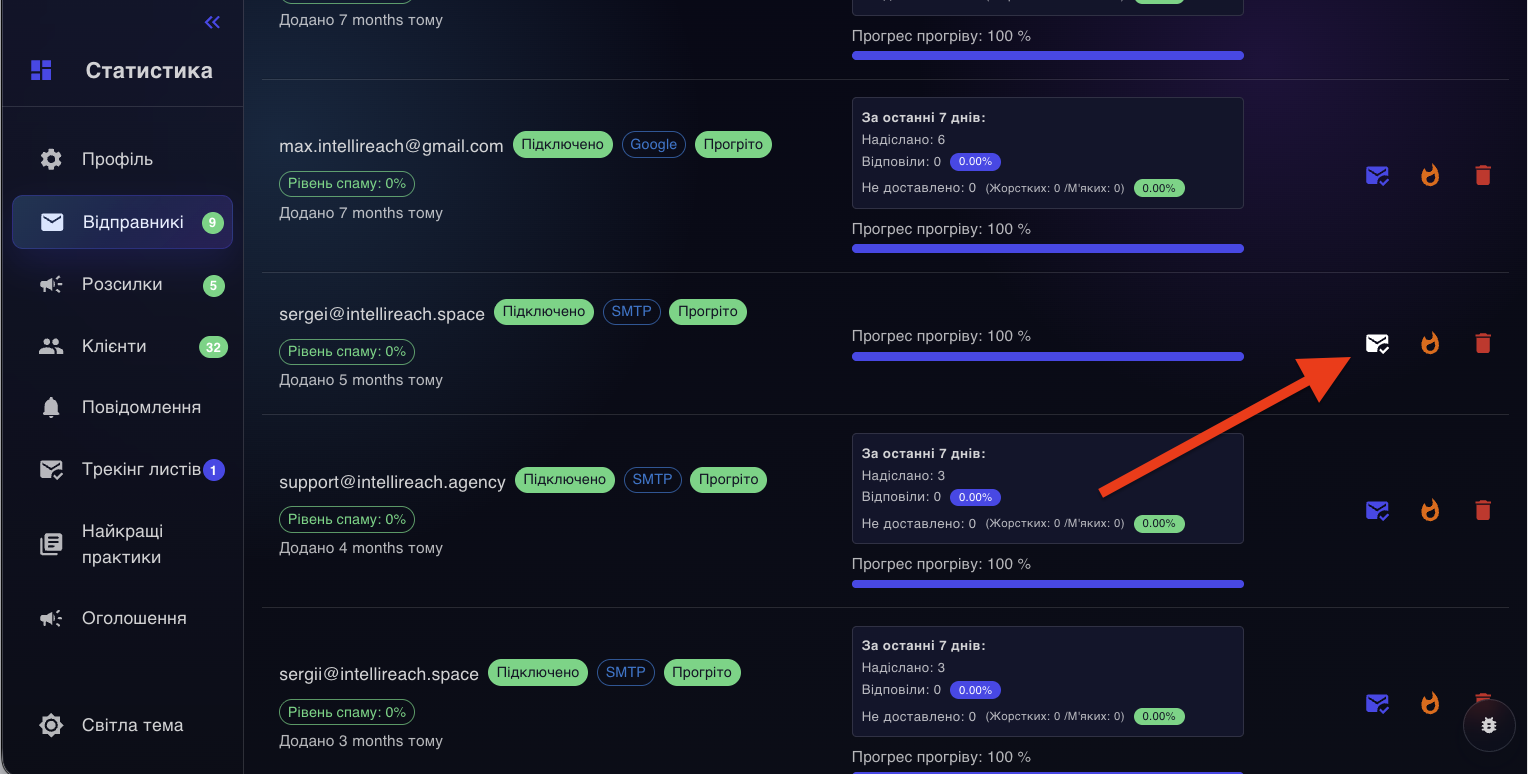
Sender account is the email inbox from which the system will send emails. In the interface, the section is called "Senders", but essentially these are simply your sender accounts.
Our recommendation for getting started: Begin with ordinary personal Gmail and Outlook accounts. Such inboxes typically have higher baseline trust from email services, so it's usually easier to achieve good deliverability at first. Later, once you understand warm-up and reputation management, you can add business Google Workspace, Microsoft 365 accounts, and addresses on your own domain.
Account type — When to use — How to connect
- Google: If you have Gmail or Google Workspace. Via OAuth: log into Google and grant access.
- Microsoft: If you have Outlook / Microsoft 365. Via OAuth: log into Microsoft and grant access.
- Custom SMTP: If you have any other email or your own SMTP server. Manually: enter SMTP account details.
Simple rule: If it's possible to connect Google or Microsoft directly, that's usually the most convenient. Use SMTP connection if your email isn't from these providers or you use your own domain.
For advanced users: If you connect business email on your own domain, authorization alone is not enough. For proper deliverability, the domain usually must have at least SPF, DKIM, DMARC, and correct MX records configured. If you run your own mail server, you typically also need PTR / reverse DNS. Without these records, emails may consistently land in spam even with good content.
How to Add a Sender Account
- Open the "Senders" section.
- Click to add a new sender account.
- Choose the provider type: Google, Microsoft, or Custom SMTP.
- Enter the sender account's email address.
- Complete the connection using the scenario below depending on the account type.
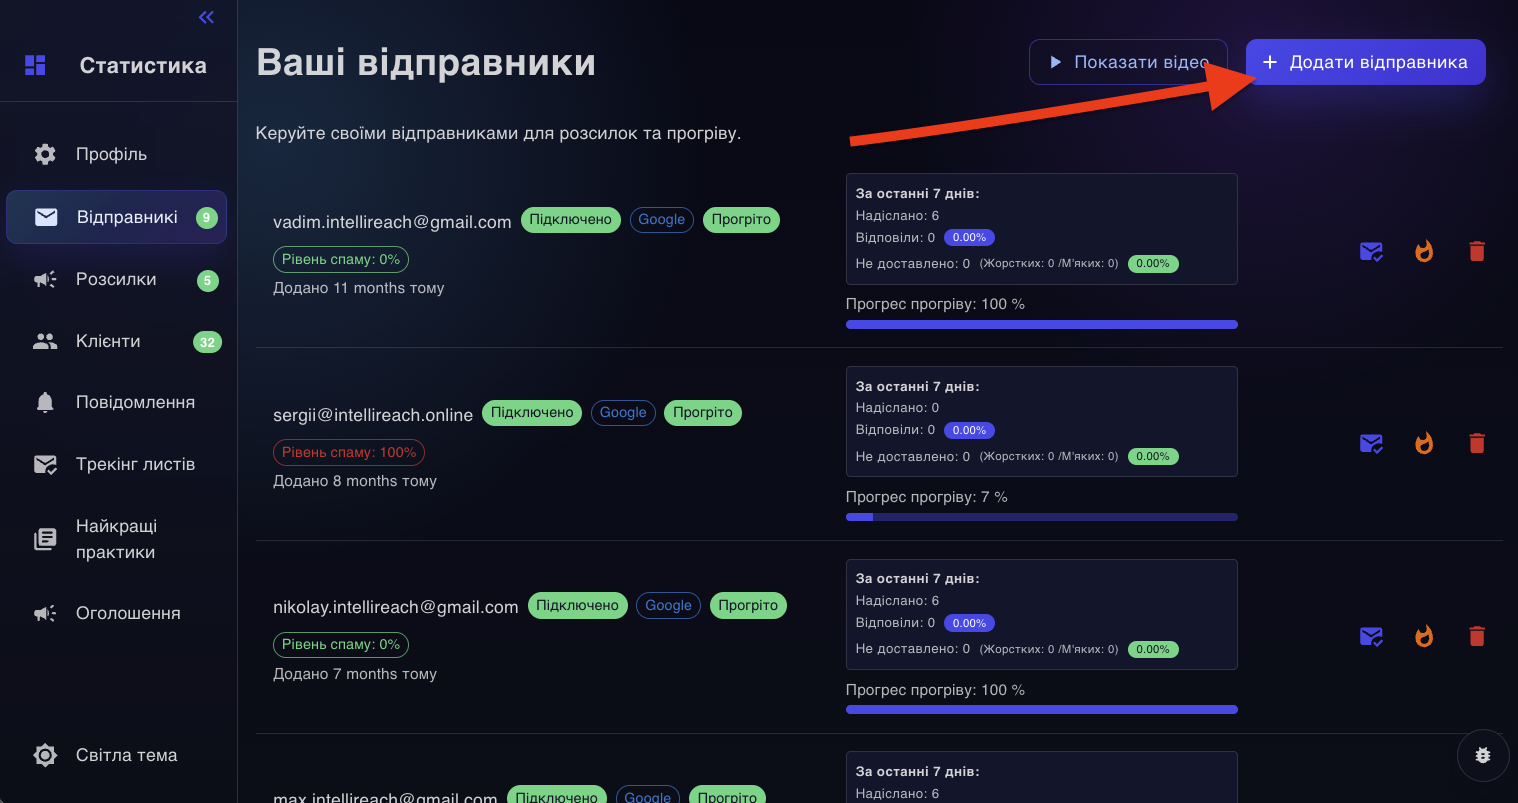
Screenshot: the "Senders" section with a list of senders and a button to add a new account.
Option 1. Google
- Select Google.
- Enter the email address of the account.
- The system will redirect you to Google.
- Log into the desired account and grant access.
- Important! Tick the checkbox allowing email sending!
- After returning to the service, make sure the account appears in the sender list.
This is the simplest way to connect Gmail. You do not need to enter your main Google account password into the service manually.
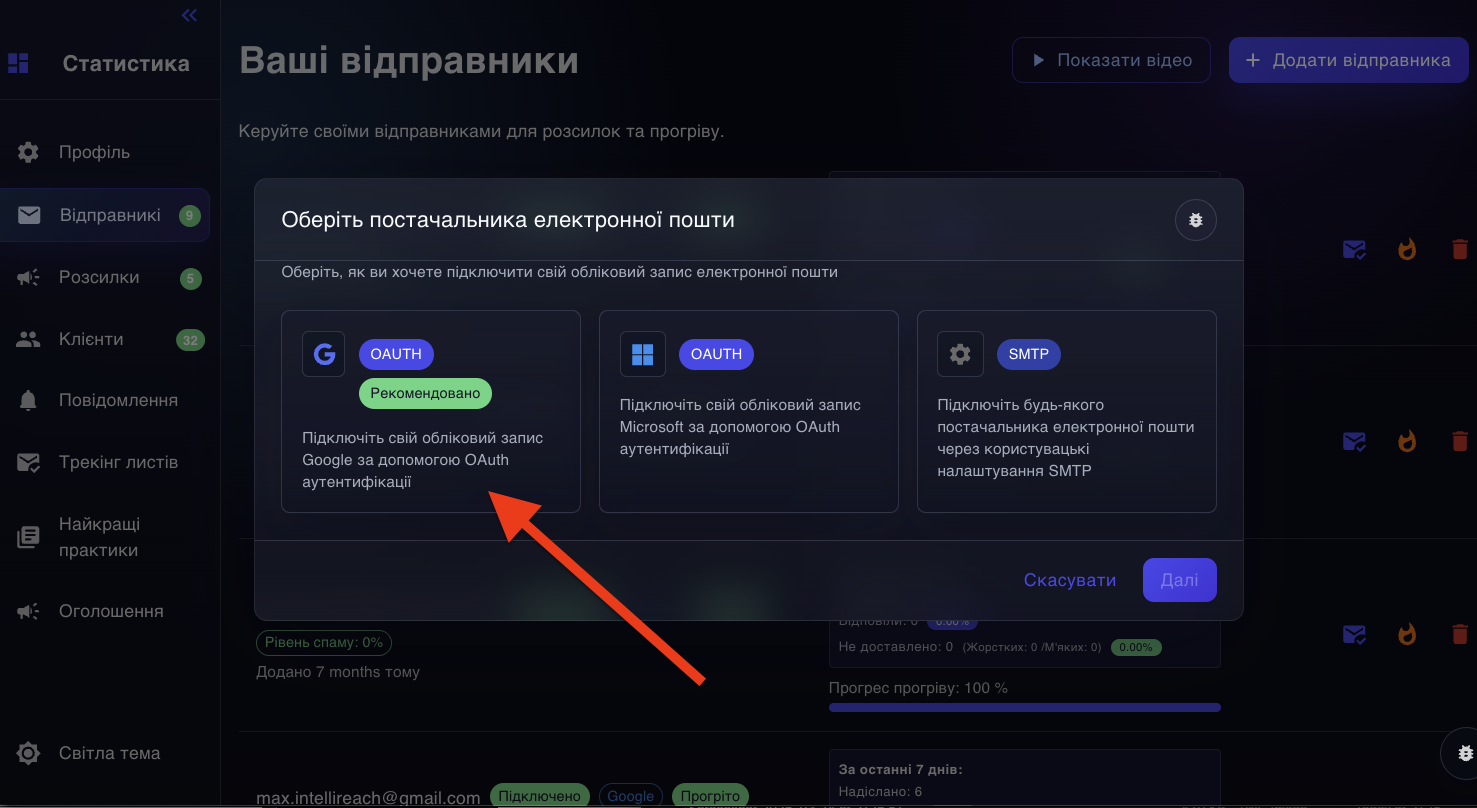
Screenshot: Google sender account connection window.
Option 2. Microsoft
- Select Microsoft.
- Enter the email address of the account.
- The system will redirect you to Microsoft.
- Log in and grant the permissions.
- After returning, check that the account is connected and appears as active.
Option 3. Custom SMTP
This option is used for non-standard emails. Here, precise SMTP settings provided by your mail provider or domain administrator are important.
Field — Meaning — What it affects
- Email: The mailbox from which emails will be sent. This is the address recipients will see.
- SMTP username: Login for accessing SMTP. Required for authentication on the sending server.
- SMTP password: Password for SMTP or a separate app password. Without it, emails will not be sent.
- SMTP host: SMTP server address, e.g.
smtp.example.com. Determines where the service connects to send mail. - SMTP port: Connection port, usually 465 or 587. Determines the type of secured connection.
- SSL/TLS: Secured connection mode. If settings are incorrect, a connection cannot be established.
If your provider uses port 465, this usually means a secured SSL/TLS connection. If using your own SMTP, always take the host, port, and security type from your provider's instructions.
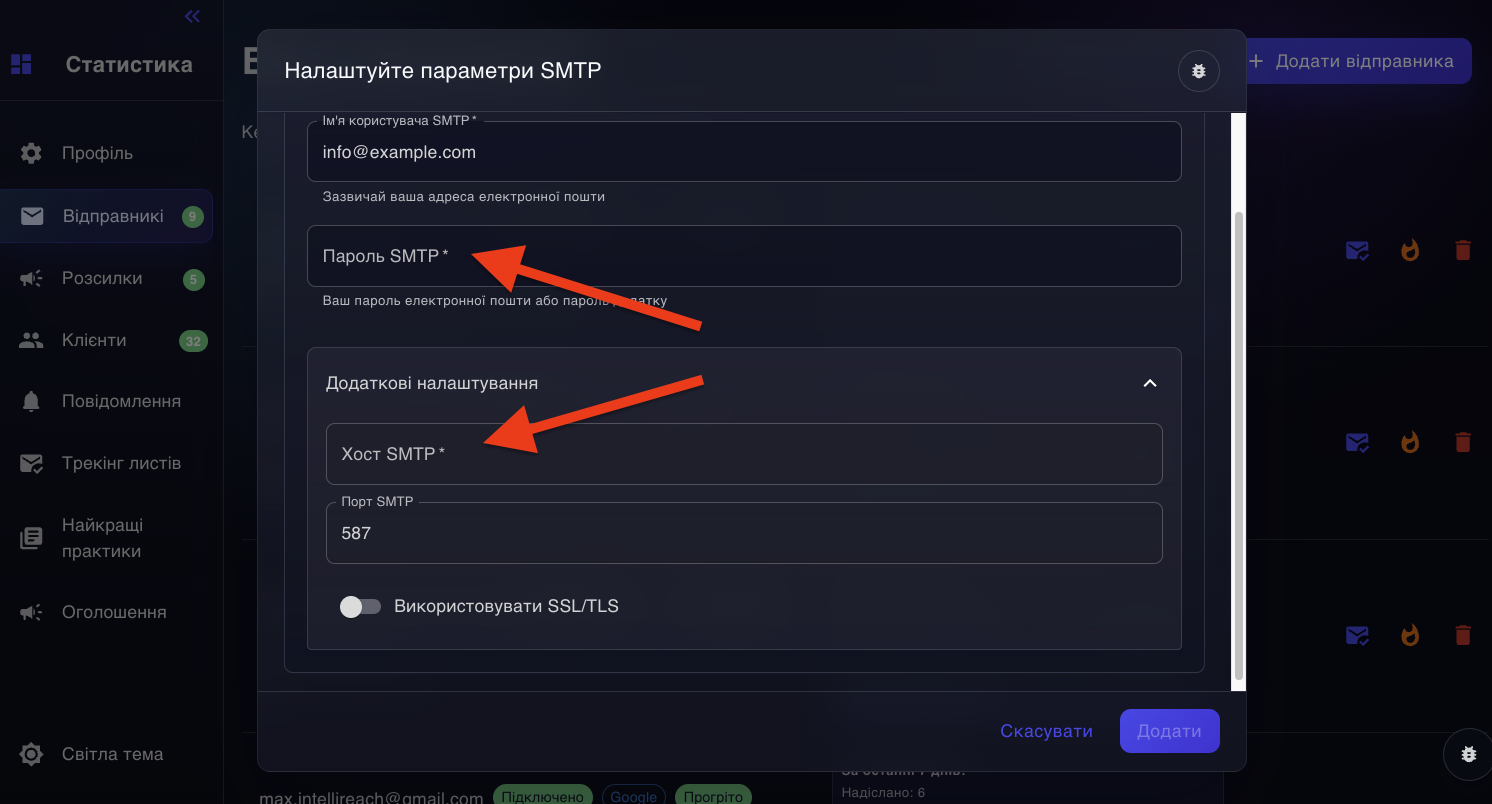
Screenshot: manual SMTP form for connecting a sender.
What to Check After Connecting
- The sender account status should be active and connected.
- If the account is new, do not start a full cold email campaign immediately: warm it up first.
- If the service shows warnings about host or port, check if SMTP and IMAP settings are mixed up.
- If the account is later marked "Disabled (Spam)", it needs to be warmed up again.
2. Warming up accounts
Warming up means gradually increasing a mailbox's activity. Simply put: you don't start sending lots of emails right away, but let the mail service get used to the account's activity.
Why warming up is needed:
- reduces the risk of being marked as spam;
- decreases the chance of blocks from Google, Microsoft, and other providers;
- helps achieve better deliverability before starting real campaigns.
Practical advice: for cold outreach, it's safer to warm up accounts not for just a few days but for 3-4 weeks. This is especially important for new mailboxes, accounts after a pause, and domain mail that hasn't been actively used before.
When warming up is mandatory
- If the account is new.
- If cold emails haven’t been sent from this account before.
- If the account hasn’t been used for a long time.
- If deliverability tests show emails start going to spam in bulk.
How to start warming up
- Open the “Senders” section (Senders).
- Find the required account.
- Click to start warmup.
- Select warmup parameters.
- Confirm the start.
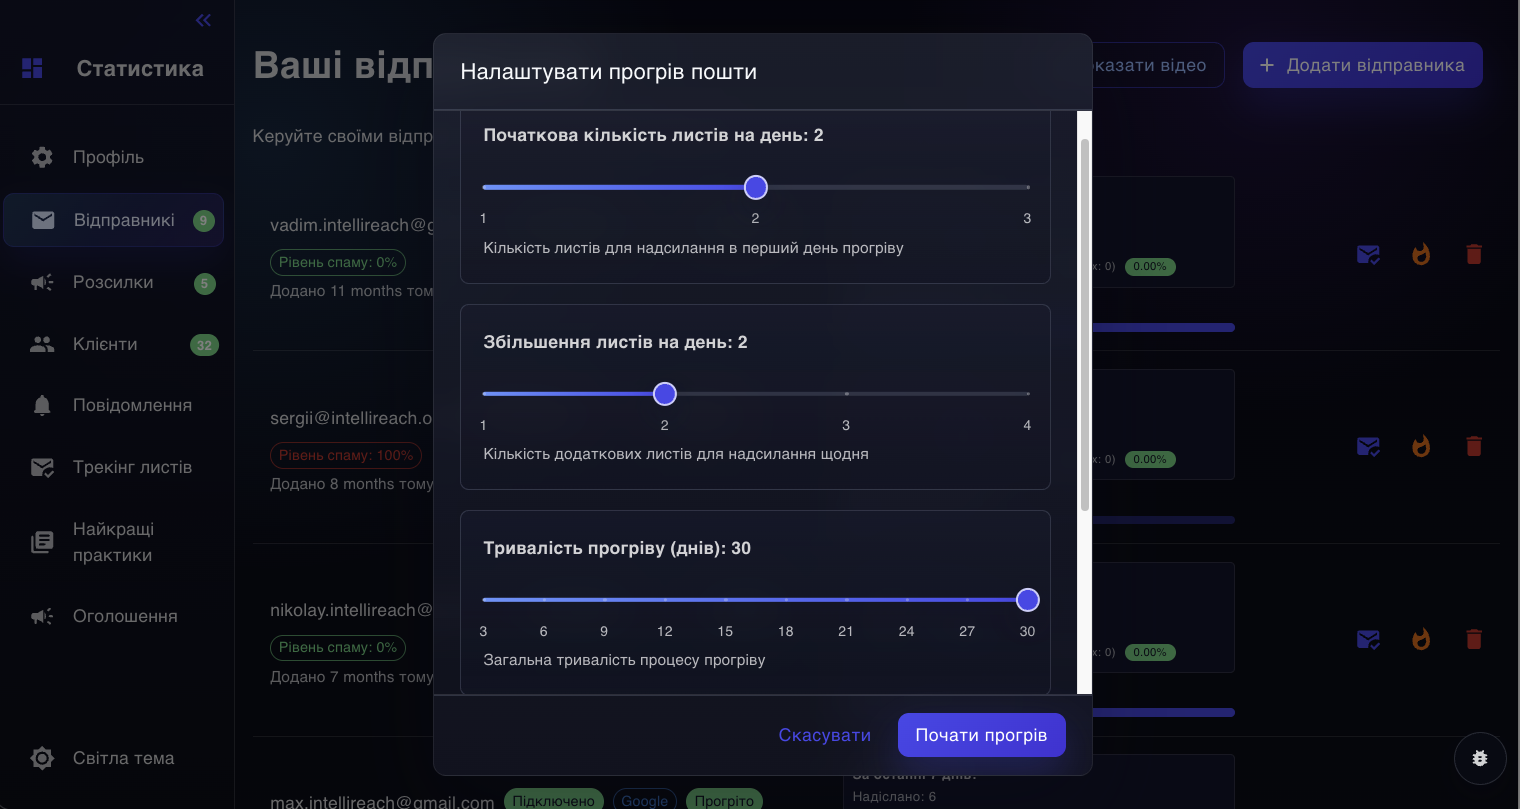
Screenshot: warmup launch dialog with warmup parameters.
What do the warmup parameters mean
Initial number of emails per day: How many emails to send on the first day of warmup. The more cautious the start, the safer it is for a new account.
Daily increase: By how many emails per day to increase the volume. Sets the speed of load increase.
Warmup duration: How many days the warmup will last. The weaker the account's reputation, the more useful a longer warmup is.
Safe start for most new accounts
- Start with 1-2 emails per day.
- Increase gradually, without sudden jumps.
- Keep the warmup for 3-4 weeks, and longer if deliverability is low.
Currently, for a new account the code creates a basic short warmup template by default: 3 emails on the first day, then +3 emails per day, and duration of 7 days. But for actual cold emailing, this is often insufficient, so it's safer to extend the warmup to 3-4 weeks.
What account statuses can you see
- New — account is connected but not warmed up yet.
- In warmup — warmup is ongoing.
- Warmed up — account is considered warmed up and ready for use.
- Disconnected — connection lost, account needs to be reconnected.
- Disconnected (Spam) — account temporarily excluded from usage due to poor deliverability.
If your account gets a spam-related status, you shouldn't continue mass sending. The right response: stop sending, warm up the account again, and review your texts.
When can you use the manual “Warmed up” mark
Only if you are sure that this mailbox has already been reliably warmed up before, outside the current system. If you are not sure, it's better not to skip the warmup.
3. Creating a Campaign
In IntelliOutreach, creating a campaign consists of two main parts:
- setting up the audience and search rules;
- preparing the email sequence.
Best practice: first, set up whom you want to write to, and only then work on the text. This way, your emails will be more targeted and your conversion rate higher.
Step-by-step campaign creation scenario
- Open the “Campaigns” section.
- Click to create a new campaign.
- Fill in the basic fields.
- If needed, describe the task to the AI assistant in plain language.
- If you need more control, enable advanced mode.
- Set limits, schedule, and sender accounts.
- Assemble the email sequence.
- Save the campaign and, after checking, start it.
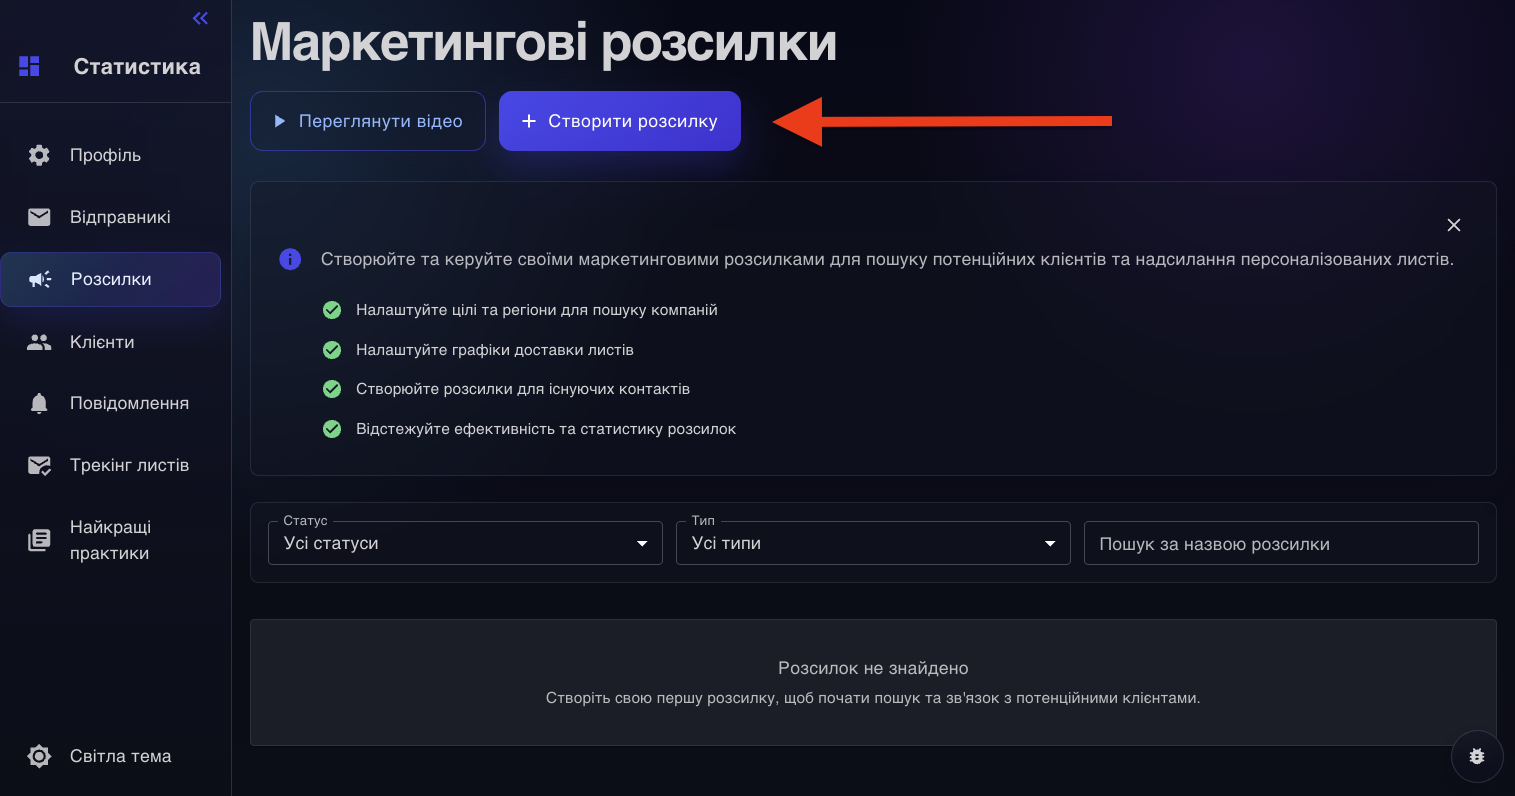
Screenshot: initial screen for creating a new campaign.
Basic fields at the top of the form
Campaign name: The name of your campaign. Make it clear, so you can quickly distinguish campaigns by market, product, or hypothesis later.
Test launch: Trial mode. Useful if you want to carefully check the setup before a larger launch.
Send to clients: Send to already existing companies from your Clients section. Enable if you want to write to your internal client database (CRM) instead of a new search.
Client types: Which types of clients from your CRM you want to send to. For example, only potential clients or only hot leads.
Excluded client types: Which types of clients need to be excluded. Useful if part of the database is clearly not relevant to your offer.
AI chat for defining the campaign task
The form contains a block for AI-based campaign description. This mode is convenient when you don’t want to manually configure the audience with all settings. Just describe the task in plain language and the system helps turn it into a structured campaign.
How it works
- You write whom you want to find and what you offer.
- The AI asks only missing clarifying questions.
- The system then compiles a summary: audience, geography, sources, and filters.
- Based on this summary, part of the campaign fields will be filled in automatically.
Good example for an AI chat request
“Find companies in Ukraine who could benefit from internet marketing: clinics, manufacturers, and online stores. I don't want too wide a sample, only companies with a website and email are of interest.”
Screenshot: AI chat block for campaign task description.
Why use the AI chat
- It helps you remember important search parameters.
- Speeds up campaign creation if you don’t want to configure all settings manually.
- Convenient when you know the task in essence but don’t want to think about field structure.
What the Intent Summary means
This is a brief summary of how the system understood your task: who to search for, where to search, how widely to search, and from which sources to collect companies.
If the summary is not accurate, do not start the campaign right away. Either clarify the task in the AI chat, or enable advanced mode and adjust everything manually.
Advanced mode: when to use
Advanced mode is needed when you want not just to describe the campaign in general, but to manually control all important search parameters. This is the mode for precise settings.
Breakdown of all advanced mode settings
Search goals: Whom exactly do you want to find: niches, company types, roles, segments. This is the basis of the search. The more precise the goal, the higher the quality. In the current interface, keep up to 5 key search directions.
Country: Search country. Restricts the geography of the whole campaign.
Business category: Main business categories. Strongly influences the relevance of found companies.
Business subcategory: Narrower subcategories within the main category. Helps narrow the sample and reduce noise.
Target audience description: Text description of the ideal client. Helps the system better match good leads.
Regions: Specific cities, areas, or regions. If you don’t want the whole country, specify required locations manually.
City size: Big / Middle / Small: Auto-selection of cities by size. Speeds up geography setup. E.g., find only big cities or small local markets.
Preferred company sources: From which sources to collect companies. Affects if the database comes from official registry, website search, Google Maps, Instagram, Prom.ua.
Override web search: Force enable, disable or leave automatic web search. Useful if you know for sure whether you need website search.
Override map search: Force enable, disable or leave automatic map search. Especially useful for local businesses: salons, clinics, restaurants, workshops, offline points.
Website presence: Whether having a website is required. You can search for any company, only with or only without a website.
Social media on site: Whether there are social media links on the site. Helps filter more “packaged” companies or less developed ones.
Email presence: Whether having an email address is required. If only direct contact is crucial, make email required.
Phone presence: Whether a phone number is required. Useful if you need a more complete company card for multichannel work.
Audience mode: Precise — narrower and more targeted. Broad — wider and more free. Precise is best for quality, narrow targeting. Broad is best for wide sampling and later filtering.
Geography coverage: Selected regions — only chosen regions. Countrywide — the entire country. Defines the campaign’s geographic scale.
Business model: Business type: online, offline/local, hybrid. Helps distinguish internet businesses, local offline, and hybrid models.
Company size estimate: Estimate of company scale: one person, micro, small, medium, and above. Useful if your offer is for small companies or, conversely, for larger businesses.
Desired result volume: Desired result volume. Normally, this is generated by the AI summary and search strategy, not a separate manual setting for daily work.
How to decide between Precise and Broad
Precise
- When you want a smaller but cleaner list.
- When the offer suits only a niche segment.
- When you don’t want to waste limits on irrelevant companies.
Broad
- When you are still testing your hypothesis.
- When you need a broader list for selection.
- When the audience is only approximately known, not very narrowly defined.

Screenshot: advanced campaign mode with manual search configuration.
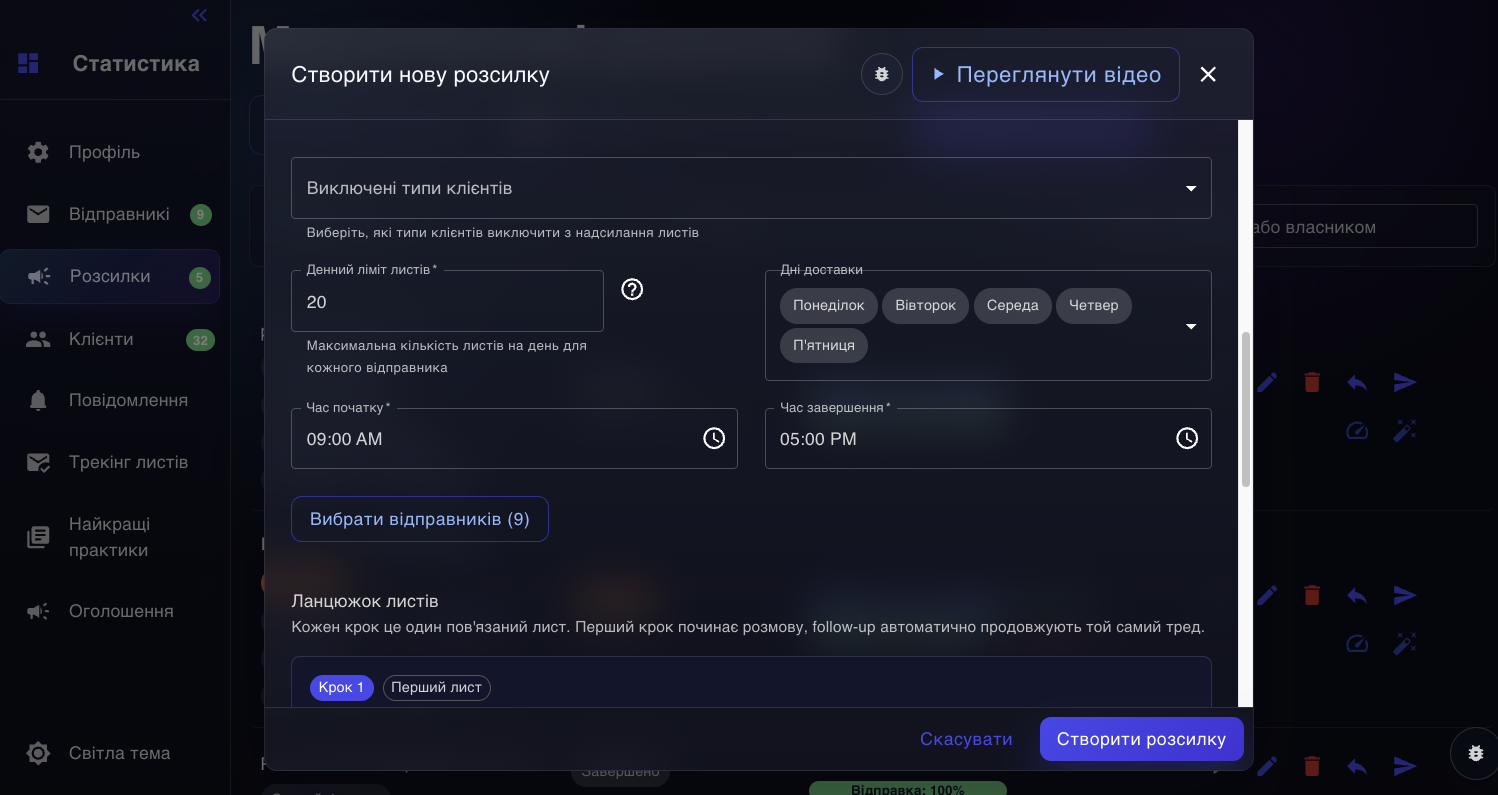
Sending limits and schedule
Daily email limit: Maximum emails per day for each sender account. For best deliverability, keep the limit moderate. Interface maximum is 40 per day per account.
Sending days: Days of the week allowed for sending. For B2B outreach, it’s usually best to leave business days only.
Start time: When sending starts. Match to the recipient's office hours.
End time: Latest time allowed for sending. Avoid late times unless necessary.
Sender account selection: Which sender accounts participate in the campaign. If not restricted manually, all available connected accounts are selected by default.
Important logic from the code: the actual sending speed for new accounts increases gradually, even if you set the desired maximum immediately in campaign settings. Currently, the system limits a new account as follows: up to 1 month — 5 emails/day, up to 2 months — 10, up to 3 months — 20, afterwards — up to 40. So you may set the desired upper limit at once, and the real sending volume will increase as accounts “mature.”
A high daily limit doesn’t make the campaign “better.” It just loads your accounts faster. In general: the fewer emails sent per account per day, the better. Add more accounts if you need to send more emails.
Screenshot: sending limits and schedule in campaign settings.
Excluded client types
You can immediately exclude client types who shouldn't receive the new campaign in this block. This is helpful to avoid writing again to those who shouldn’t receive cold emails anymore.
- Exclude Unsubscribed to respect their choice and not damage sender reputation.
- Exclude Client if it’s already an active client and needs a separate communication scenario.
- Exclude Rejected if you know these companies are not your target.
- This filter is particularly useful for repeated CRM-based campaigns to avoid mixing new leads, current clients, and unsubscribed contacts.
Screenshot: excluded client types in campaign settings.
Building the email sequence
Each campaign uses an email sequence: the initial message and follow-up reminders. In the current interface, you can build up to 3 steps: the first email and up to two further follow-ups.
How the sequence works
- Step 1 — the first email: has a subject and body.
- Step 2 and onward — subsequent emails: have text and a delay in days after the previous step.
- Subsequent messages are sent as replies in the same conversation thread.
- If the recipient replies, the remaining sequence steps stop automatically.
What follow-up delay means
This is the pause between emails. For example, if the follow-up email has a 3 days delay, the second message will go three days after the previous step if the person hasn't replied.
How to write the first email
- The subject must be short, natural, and without “shouting” promises.
- Write the email simply, like a business message, not as a marketing banner.
- Don't overload the email with bold text, links, colors, or complex formatting.
- One clear offer and one clear next step work best.
Spintax: what it is and how to use it
Spintax is a way to generate several natural variations of the same text. The system randomly inserts one of the variants so the emails aren’t all identical.
Syntax
Use the format:
{Hi|Hello|Good day}This means one option will be randomly selected in the email.
Where to use spintax
- in the email subject;
- in the greeting;
- in 1–2 sentences of the main text;
- in a soft CTA or closing phrase.
How to use spintax properly
- Make small variants, not completely different texts.
- Usually, 3–5 options in one spot are enough.
- No need to “spin” every sentence.
- After inserting, use preview to see a ready example email.
- If the system warns about unclosed curly braces, fix the syntax before sending.
Improve with AI
For subject and body, there is a “Improve with AI” button. It rewrites your current draft in a neater, clearer, and more deliverable form.
How it works
- You write your draft.
- Click “Improve with AI”.
- The system generates one improved version, ready for spintax.
- You can view, copy, replace your text, or request another version.
Each AI generation or regeneration costs 30 credits. This applies to subject and body improvement.
When AI improvements are especially useful
- if the text is too salesy;
- if the email sounds harsh or unnatural;
- if you want a safer, more deliverable variant quickly;
- if you need a shorter or more professional-sounding text.
Check style: quick quality review
The form has a quick style check for the subject or text variant. This helps you quickly see what looks good and what may hurt perception or deliverability.
This is not a replacement for common sense but is a good final check before sending.
Signature and unsubscribe link
Use sender name in signature: Inserts the sender account's name in the email signature. Makes the email more personal and natural.
Add unsubscribe link: Adds an unsubscribe link. Useful in some situations, but in the first cold email extra links can reduce deliverability.
If you are unsure, don't overload your first email with links. The interface shows a warning that an unsubscribe link in the first cold email can reduce inbox placement.
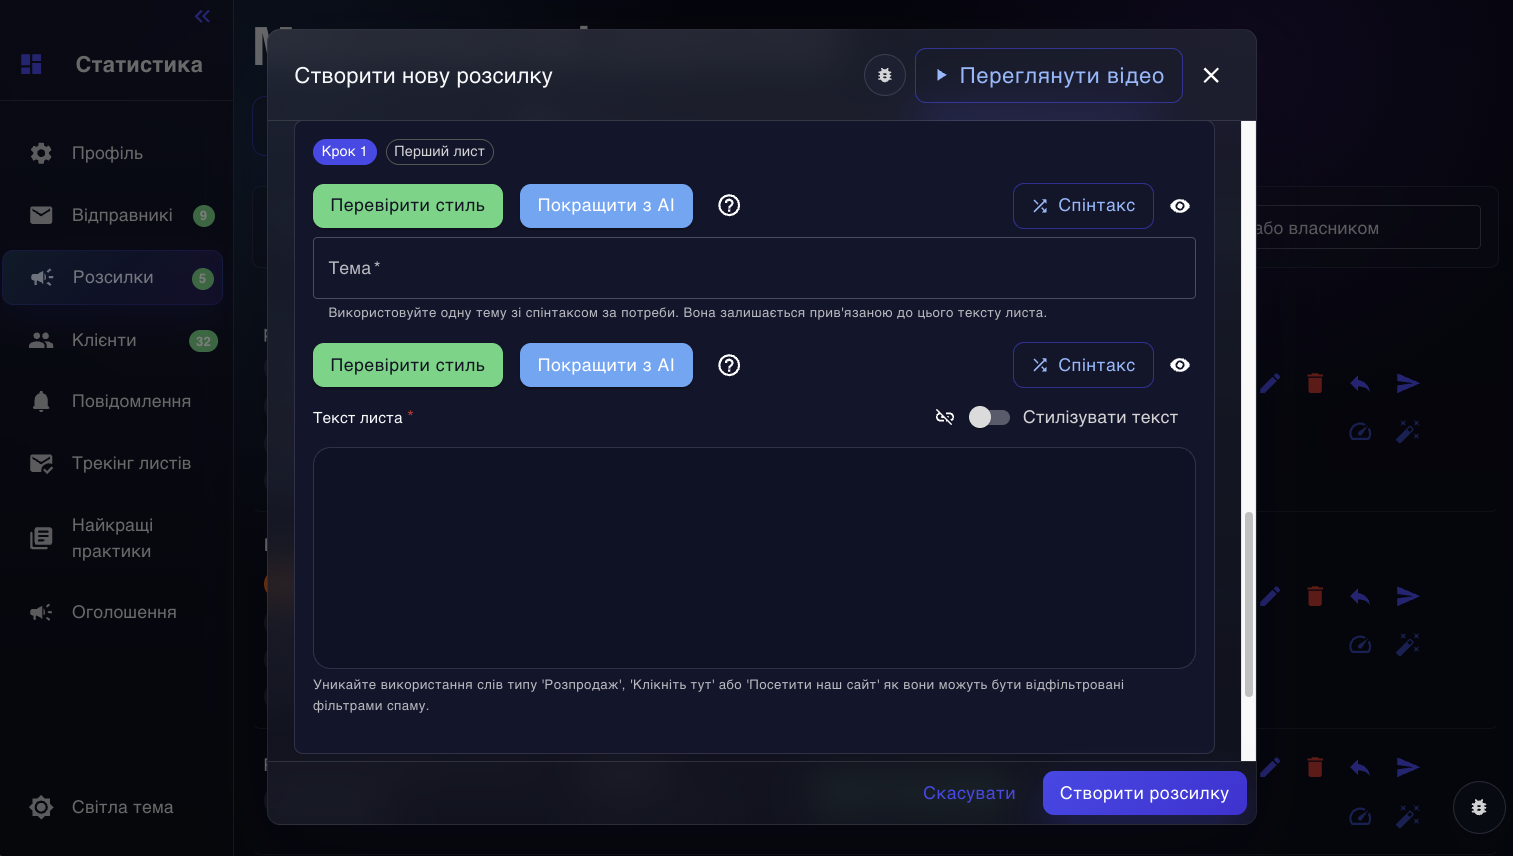
Screenshot: email sequence and follow-up steps editor.
4. Launching a Campaign and Monitoring Results
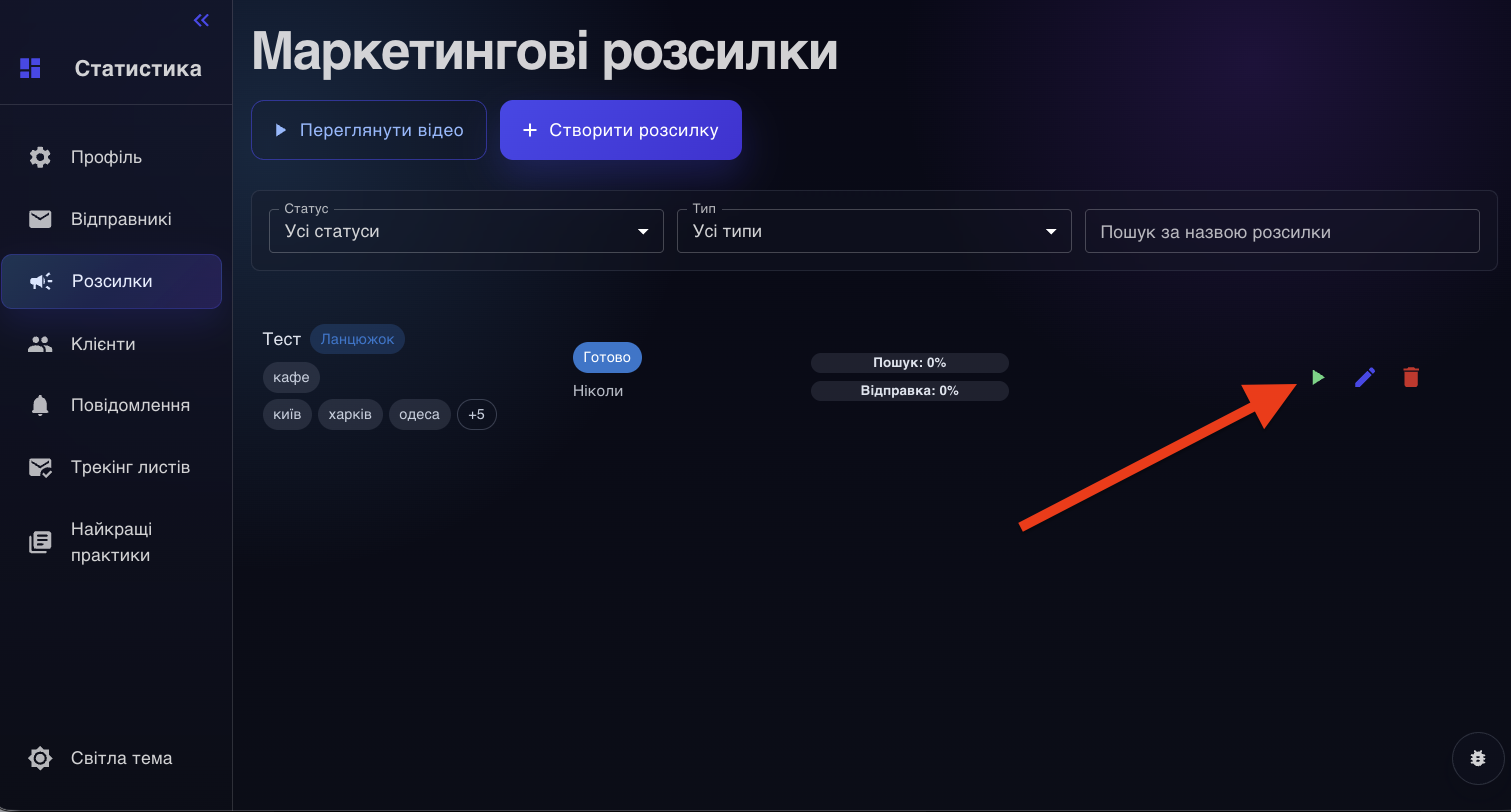
How to Launch a Campaign
- Open the campaigns list.
- Find the campaign you need.
- Click launch.
- If the system shows a warning about un-warmed sender accounts, it is best to stop and resolve the warming issue first.
Screenshot: campaign list with statuses and launch action.
Launching cold outreach without warmed-up accounts is risky. The service explicitly warns that this can affect deliverability and may even lead to blocks.
Where to View Results
The main data is viewed in two places:
- in the “Campaigns” list (Campaigns) — for quick state monitoring;
- in the details of a specific campaign — for deeper analysis.
What You See in the “Campaigns” List
- campaign status: ready, launched, stopped, completed, paused, etc.;
- company search progress;
- email sending progress;
- current deliverability snapshot, if there is already data for the campaign;
- text quality marks, if a check was run.
What to Look For in Campaign Details
- Total companies found — how many companies were found.
- Companies without email — how many companies were found without an email address.
- Total email addresses found — how many email addresses were found.
- Invalid email addresses — how many addresses were rejected as invalid.
- Total emails sent — how many emails were actually sent.
- Reply rate — the share of replies. Especially useful if sender accounts have reply tracking enabled.
- Unsubscribed (Unsubscribed) — how many contacts were excluded from further communication.
- Daily activity — daily activity for the campaign.
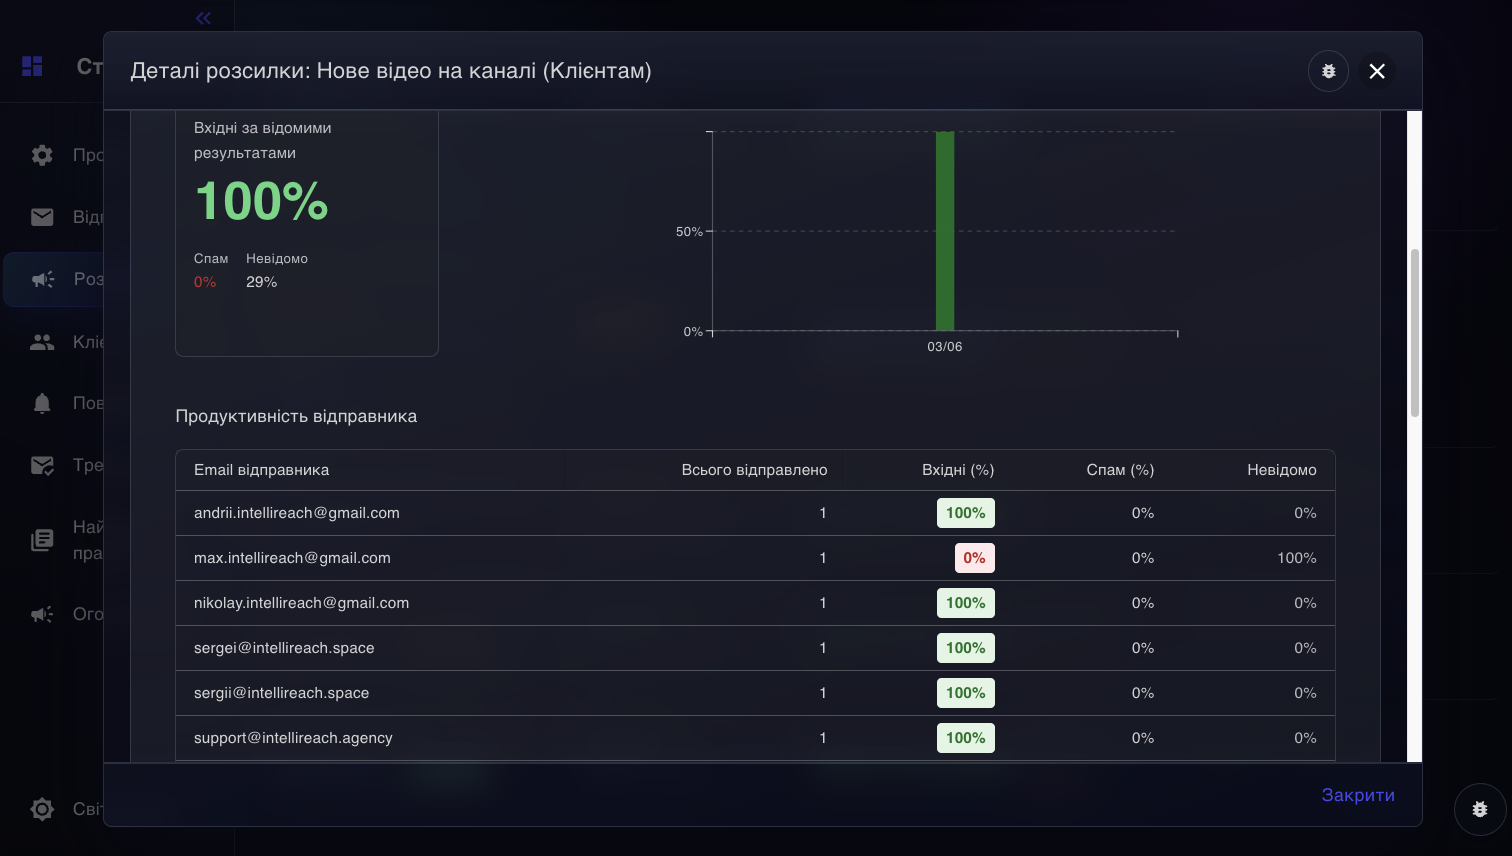
How to Monitor Deliverability
For this, the campaign has a “Deliverability Test” (Deliverability Test) block. It shows where test emails typically end up:
- Inbox (Inbox) — emails reach inbox normally.
- Spam — emails go to spam, intervention required.
- Unknown (Unknown) — there is not yet a precise result or placement is undefined.
What’s Especially Important to Watch
- the overall inbox rate (Inbox rate) for the campaign;
- the overall spam rate (Spam rate) for the campaign;
- breakdown by individual sender accounts;
- trend over time: has it gotten better or worse after launch.
If Deliverability Is Poor
- Pause or stop the campaign.
- Give sender accounts at least another week of warming up.
- Lower the daily limit per sender account.
- Simplify your texts: fewer links, less “salesy” phrasing, less formatting.
- Check the email subject and first sentence: these often hurt deliverability the most.
- After this, monitor deliverability metrics again and only then consider scaling up.
Screenshot: deliverability test block in campaign details.
How to Know When It's Time to Take Action
- The spam rate (Spam rate) increases noticeably.
- The inbox rate (Inbox rate) decreases after the campaign starts.
- Sender accounts start to get a bad reputation or are disabled due to spam.
- Few replies, while the subject and text look too promotional or are hard to read.
5. The "Clients" Section
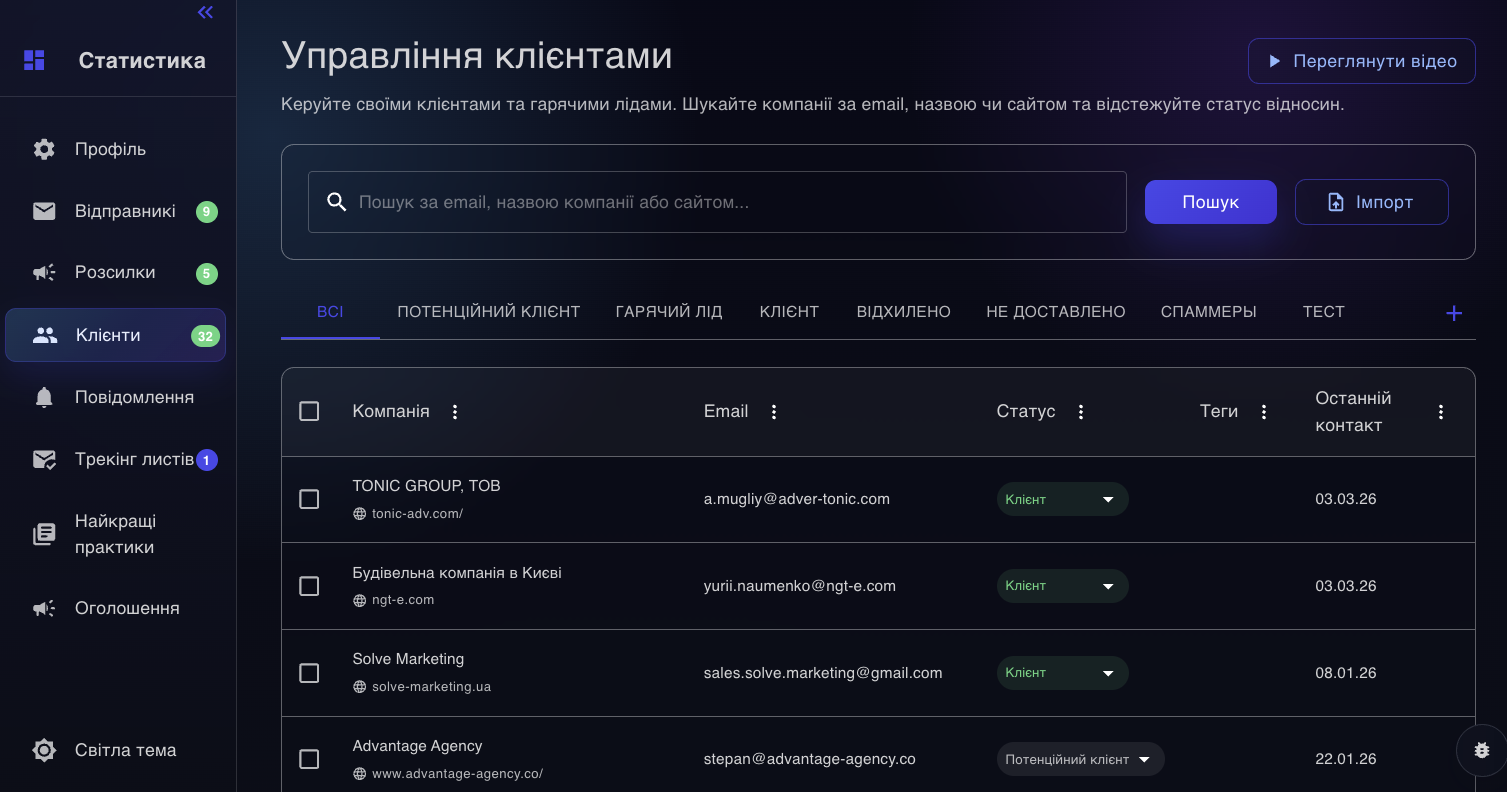
The "Clients" (Clients) section is the internal client database (CRM) within IntelliOutreach. Here you can store companies you are already working with or want to work with: those found by the system, imported manually, or added from your inbox.
Why you need the "Clients" section
- to keep a database of companies and contacts in one place;
- to categorize your database by status;
- to see communication history;
- to launch mailings using your accumulated client database (CRM);
- to add notes, tags, and change statuses as you work.
Main statuses in the client database
- Prospect — the company is potentially interesting.
- Hot Lead — a warm lead with increased interest.
- Client — an active client.
- Rejected — the company is not suitable or no longer relevant.
The system can also use additional custom statuses if allowed by your plan and settings.
How to use the "Clients" section
- Open the "Clients" (Clients) section.
- Use the search by email, company, or website to quickly find the needed profile.
- Open the company’s profile and update the status, tags, and notes.
- View the history of sent messages and replies for the company.
- If necessary, send an individual email directly from the profile.
What you can do in the client table
- search and filter companies;
- sort the list;
- show and hide columns;
- select multiple records at once;
- bulk change statuses;
- bulk delete records;
- delete all records from the current filtered view, if needed.
Screenshot: client table with search, filters, and bulk actions.
Importing a database into the "Clients" section
You can import a database from .xlsx, .xls, or .csv files.
- Open the "Clients" section.
- Select import.
- Upload the file.
- Specify which status to assign to the imported companies.
- Add tags if needed.
- Check the result after importing.
According to the current interface logic, import does not replace company search, but simply adds ready data to the internal client database (CRM). The service also checks email addresses during import.

Screenshot: client database import from a file.
How to fill out a company profile
You can keep the following information in a company profile:
- company name;
- website;
- email address and phone numbers;
- social network links;
- location;
- notes;
- tags;
- the history of sent emails and replies.
Why this is convenient
- You don’t lose track of a company after the first mailing.
- You can quickly move a lead to another status.
- It’s convenient to separate cold contacts, warm leads, and actual clients.
- You can launch separate campaigns using the client database (CRM), not only the new search results.
6. The "Reply Tracking" Section
Reply tracking allows the service not only to send emails but also to see incoming replies from your mailboxes. Thanks to this, replies are gathered in one place, and subsequent email sequences behave correctly.
The main benefit of tracking: when someone replies, you see it in the unified inbox section, can respond quickly, link the conversation to the client's card, and avoid unnecessary follow-up emails.
What reply tracking offers
- a unified inbox section for all connected sender accounts;
- automatic collection of incoming replies;
- pausing the remaining steps in a sequence after a real recipient reply;
- better reply metrics and some analytics on responses;
- the ability to reply directly from the interface.
How to enable tracking
- Open the “Senders” section (Senders).
- Find the desired sender account.
- Enable reply tracking for it.
- Walk through the connection scenario depending on account type.
- If asked by the system, be sure to test the connection before saving.
Screenshot: enabling reply tracking and IMAP setup.
How connection differs for various account types
Account Type: Google OAuth
- How tracking is connected: An IMAP dialog opens, usually requiring a Google App Password
- Important note: For Gmail, you usually must enable two-factor protection in Google and generate a separate app password
Account Type: Microsoft OAuth
- How tracking is connected: The system guides you through a repeated OAuth connection for IMAP access
- Important note: Typically, you do not need to enter a separate IMAP password; authorization goes through OAuth2 / XOAUTH2
Account Type: Custom SMTP
- How tracking is connected: You need to manually specify the IMAP host, IMAP port, security type, and password
- Important note: After entering details, you must click "Test Connection"; you cannot save unless the test is successful
What the IMAP connection fields mean
IMAP Host: Incoming mail server address, for example, imap.gmail.com. The service uses this to read incoming replies.
IMAP Port: The port of the incoming mail server. Determines connection type and whether the service can connect.
Security / SSL: Secure IMAP connection mode. If set incorrectly, tracking will not work.
Password / app password: Password for reading mail or a separate app password. Required for authorization to incoming mail.
Do not confuse SMTP and IMAP. SMTP is for sending, IMAP is for reading incoming emails and replies. If you mix up the host or port, tracking will not connect.
Where to view replies after connecting
After enabling tracking, replies appear in a unified inbox section, which usually features:
- tabs like Open, Archived, and Snoozed;
- search by conversation;
- manual inbox refresh;
- replying directly from the interface;
- connecting conversations to a company card in the “Clients” section;
- archive, snooze, and delete dialogues.
![]()
Screenshot: unified inbox with replies after enabling reply tracking.
How tracking works with sequences
- if someone replies, further sequence emails to them are stopped;
- if you reply yourself from the inbox section, it is treated as a normal reply in the same thread;
- subsequent emails from step 2 and beyond are sent in the same conversation thread;
- auto-replies like out-of-office are not always counted as a genuine reply.
Limitations and practical notes
- In the current interface, the free plan (free) limits reply tracking to one sender account at a time.
- For Gmail, tracking often depends on properly creating an app password.
- For non-standard mail, a successful connection test is necessary before saving.
- If tracking is not enabled, you can still send emails, but you will have less useful reply analytics within the system.
7. Subscription and Invoice Billing
If paying for a plan by bank card is inconvenient for you, in the Profile section there is a separate Invoice Billing block for non-cash payment via invoice. This scenario suits sole proprietors, LLCs, and other legal entities that require an official invoice for a plan or additional credits.
According to the current product logic, you save your company details once, then create an invoice, and after the administrator confirms payment, your subscription or credits are activated automatically.
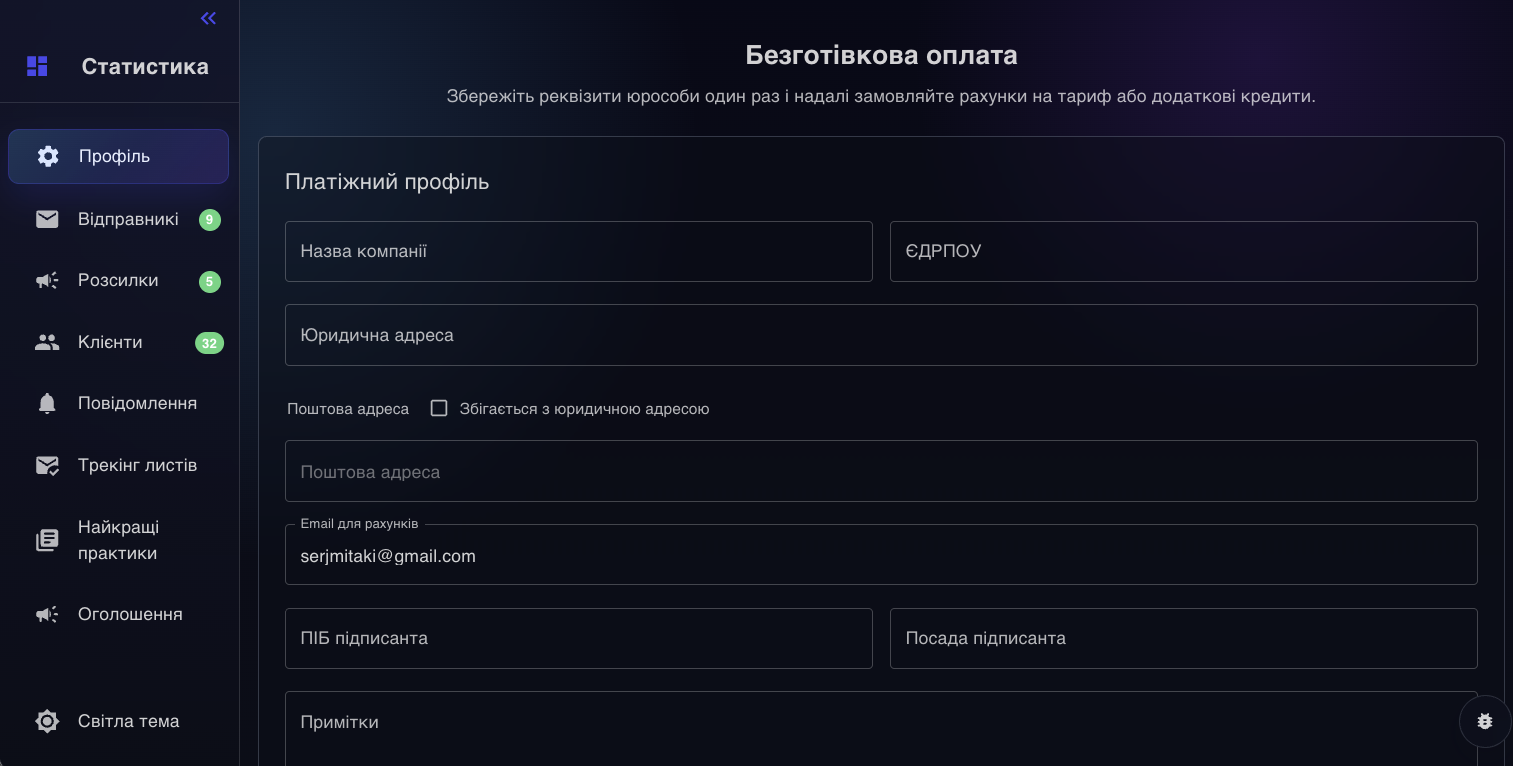
Screenshot: Invoice Billing section in profile for non-cash payments.
When to use invoice billing
- If payment should be made from the company or sole proprietor, not a personal card.
- If you need an official invoice for subscription, credits, or a mixed order.
- If your accounting department needs company details, email for documents, and invoice history all in one place.
Which fields must be filled out
Company name
The legal name of the company or sole proprietor
Will be included in the invoice and payment documents
EDRPOU
EDRPOU code or TIN/registration code
Required for proper invoice processing
Legal address
The legal address of the company
Used in the billing profile and documents
Postal address
Postal address, if different from the legal address
Required for details and document circulation
Billing email
The email address to receive invoices
The system will send PDF invoices and related documents here
Signer name / Signer title
Full name and job title of the signer
Used for legal entity documents
Notes
Additional comments for the invoice
Useful for internal remarks or accounting requests
Step-by-step instructions
- Open the Profile section.
- Scroll down to the Invoice Billing block.
- Fill in the company details: name, EDRPOU, legal address, billing email, signer and postal address if needed.
- If the postal address matches the legal address, enable the Same as legal address option.
- Click Save billing profile to save your details once.
- In the Create invoice block select what you want to pay for: plan, extra credits, or both at once.
- If you need a plan, select one in the Subscription plan field.
- If you need only credits or extra credits, specify the amount in the Extra credits field.
- Click Create invoice.
- Wait for a message with your invoice to your Billing email and pay it via bank transfer.
- After payment, send the payment confirmation to support@intellireach.agency.
- Then, within a day after payment verification, your plan or credits will be activated.
What happens after payment: Once you send the payment confirmation to support@intellireach.agency, the team will verify the payment, and within the day your plan will be activated and credits granted. If the invoice included the plan, the system will switch your subscription to monthly invoicing mode, so in the future new invoices will arrive automatically. At the end of the month, a report of work completed will also be sent automatically.
What you can pay for by invoice
- Only the subscription plan.
- Only additional credits.
- Mixed invoice: plan plus extra credits in one document.
How credits work: In this logic, 1 credit = 1 found lead + one email sent to them. That is, a credit is spent not just for the search or just for sending separately, but for the complete basic step: the system finds a lead and sends an email.
Where to view status and documents
Below on the same page there is a section for payment document history. There you can view created invoices, payment deadlines, download the PDF invoice, and, if available, related acts.
If your subscription already works via bank transfer, your profile will also show the fields Next invoice date and Next payment due date.
In the current process, payment confirmation is still performed manually by an administrator. If the invoice is not paid on time, then after a grace period of 5 days the paid subscription may revert to the free plan.
Practical Deliverability Tips
- Do not launch a cold campaign from un-warmed accounts.
- Do not set a high daily limit "just in case."
- Write simple emails without unnecessary links and heavy formatting.
- Do not make the subject line too promotional.
- Use spintax moderately, not aggressively.
- Monitor the deliverability test (Deliverability Test) after campaign launch.
- If tests are poor, pause the campaign, warm up accounts for another week, and improve your texts.
- Enable reply tracking on at least some sender accounts to see the real response picture.
A simple rule: if you are in doubt between "making the email prettier" and "making the email simpler," the simpler, calmer, and more natural option usually wins for cold outreach.
Ready to apply this in a live campaign?
Use these patterns inside IntelliReach to launch safer outbound systems, improve reply quality and keep workflows consistent.